Wednesday, November 13, 2013

Christmas tradition No.1

Hello my friends.
 
The year is coming to its end so fast and Christmas is almost here. It is my favorite time of year, especially where I come from (Germany) Christmas has a long history with such beautiful traditions.
 
But, today I just want to share one of the Christmas traditions that I grew up with and I think it is just a great idea for kids and adults to make this time of year even more special and exciting.
 
I don't know if many of you ever heard of Christmas Calendar's. But, in Germany every kid and sometimes even grown-ups receive a Christmas Calendar on the first day of December.
 
Let me give you an idea of what I am talking about. The first picture shows the unfinished Christmas Calendars from my children, that their grandma made for them and mama has to fill, usually with chocolate or little tiny toys that fit in the sacks. And every day, the kids can open one sack until Christmas is here. I used to love it so much even if it was just chocolate, I could hardly wait until the next day.
 
 
Of course, as you can see there are just 3 sacks but I have 48 of them to fill and to hang on the little loops.
Besides that, if you are looking for the 25th sack, well, in Germany everybody is celebrating Christmas the evening of the 24th and not the 25th. But, I will share that story in a later post. Trust me, when it comes to Christmas I will write many, many posts and share my love for it.
But, see this is just one example of a Christmas calendar and there are so many more neat ideas how to do make one & believe me there is no limit to creativity. (Find them online or on Pinterest)
 
 LET'S CHECK THEM OUT!!!
 
What a great idea is this one. You could hang it in their rooms, (if you trust them ;), or high enough so they can't reach it), or even over the dining table.
 
 
I love, love, love the next one. It is so gorgeous, but probably a lot of work if you have to make more than one. 
 
 
Or if you don't have the time to make one yourself, just buy one. I saw similar chocolate calendars at IKEA for instance.
 
 
The next two are awesome and doable for more than one child.


And finally, here is one where the little surprises even get to peak out.
 
 
And again, trust me when I tell you, your kids will love it and it is so worth the time and effort you put in it. Just imagine the smiling face!!


Monday, November 11, 2013

Thanksgiving Desserts

I love desserts, especially on Holidays like Thanksgiving and Christmas. So today I want to share some of my favorite Thanksgiving dessert ideas - if you need the recipe of one of them - just check Pinterest and you will find the link. So here we go. Enjoy - and start graving lol.

My absolute favorite one is sweet potato casserole with vanilla ice cream, omg there is nothing better.
 
I think the following apple pie looks delicious as well, and if cinnamon is added, wow!
 
 
A great idea are the banana pudding shots, which gives every guest their own portion. And it looks very neat.
 
 
Below are caramel cheesecake muffins. Very delicious.
 
 
Of course, pumpkin cream role is a great idea as well. And needs nothing with it.
 
 
Also a pecan pie is very delicious
 
 
The next two, are a great idea for the young guests.


And finally, if you want to present a variety of deserts, then this is a must-do table setting !


I hope you enjoyed exploring these ideas.


Monday, October 28, 2013

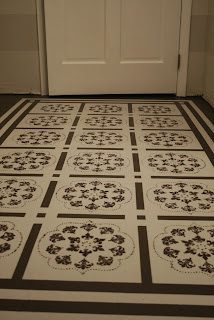
DIY- Floor remodeling


Hello Friends, I thought I share a DIY Idea with you today. As you might remember I remodeled my staircase by ripping out my carpet and painting the stairs in brown and white. Well, guess what? I want to do the same thing in my hallway upstairs with the color I have left from my staircase project.

I found some awesome inspirational pictures that I would like to share with you. Remodeling does not have to be expensive all the time!! And it still looks really great. I found a couple of pictures on Pinterest that I would like to share with you. And maybe you want to start your own project as well. ( Just in case if you cannot make up you mind which color to choose, well ask me, maybe I can help you with that)

Ok LADIES & GENTLEMEN: The remodeled floor projects!!


As you can see there are no limits on your creativity. If you go with a lot of work by applying stencils or if you simply paint it in one color with a lighter or darker frame, that all depends on what you like, and how much time you can invest. But I personally love this idea and will definitely conquer this very soon and will share my before and after with you!!


Tuesday, October 22, 2013

Chair Upholstery Project!!


Hello, hello...
I'm sorry, that it took me a while to post something new!
I don't about you, but I have many chairs in my home where the seat covers are worn down from the kids or cats or both or simple from using them all the time. Well, today I had enough of looking at my ugly worn down kitchen chairs and decided it is time for a CHANGE!


This is one of my kitchen chairs. It is hard to see on the picture but it is actually a green carpet-like material. My cats didn't like it either, I guess,  so they decided to sharpen their claws on them, which caused nice little black threads hanging out on the top of the chair. Awesome...
Well anyways, today I decided that I need to change these embarrassing chairs.... The chairs themselves are not that bad but the covers had to go. So I went to a Fabrics Store (actually I believe that was the first time for me, here in the U.S.) And I have to tell you, it was overwhelming. I mean they had fabric sections, categorized in type and color.... yeah- you can imagine that I spend at least an hour to narrow down the color and finally I only had two samples in my hand.
How do people make decisions in there.... incredible!! lol
Anyways, back home I took my fabric (1.5 yards - for 4 chairs) and cut it in 4 pieces.... isn't it awesome...

So basically what you will need is: Scissors, screwdriver, and a Stable gun.
After I cut my pieces, I started to unscrew the cushion from the chair.


Since today was a nice day outside, I took it all on the back porch since the gun can be kind of loud.
I have to apologize I have no pictures from the process, I guess I was day-dreaming so I can only show you the final product.
But all you do is, you lay down the fabric and place the cushion on it the way you like to have it. Make sure you have it on the right side. and then start to stable one side down. When it came to the corners, I folded the middle down first and then each side on top of the middle part.


Before                                                     After


As you can see, it makes such a big difference and it is so simple and easy to fix, and I wondered the whole time while I was working on the chairs, " why I have never thought of it before." It took me for all four chairs approximately 1.5 hours, to get it done. If you are inspired now, and want to do the same thing to your old chairs, then please let me know! I would love to see some pictures and would like to share it here!!!

Wednesday, October 16, 2013

Quick pasta carbonara


Hello my friends, I thought I share one of my favorite recipes from one of my cookbooks with you. My family loves it and it is so easy to make. If you are like me and don't know what to make for dinner so many times - maybe this will give you an idea.


Ok, here we go, this is what you need.
 
1/2 lb. (1 package) Fettuccine
Bacon (the recipe suggests 4 slices, but that all depends on how much of a bacon lover you are, I added more maybe 2-3 more)
4oz. Philadelphia Cream Cheese, cubed
1 cup frozen peas
3/4 cup Milk
1/2 Parmesan cheese
1/2 garlic powder
 
Ok, I have one remark to make about cooking the bacon. Usually you would probably use a skillet to fry it in because it is fast, but I really don't like all the grease even after putting it on a paper towel. I preheat my oven to at least 425F- take a backing dish- put aluminum foil on top and poke hole in it with a fork (hold the foil while doing it). then I place the bacon on it and bake it until crisp. The fat will run down through the holes in the foil and so your bacon will not swim in it.
 
First step, bake the bacon - remove it from the oven and let it try off on a paper towel. Reserve 2 Tbsp. of drippings.
Take a skillet and combine cheese, peas, milk, Parmesan and garlic powder. Cook until cream cheese is melted and the mixture is well blended and heated through.
Once this is done, simple add Fettuccine and break bacon into little bits - add that as well- mix lightly.
In the end sprinkle a little bit of extra parmesan on top. This should make 4 Servings.
 
You can serve a nice garden salad with it.
 
 
Let me know how you liked it! And share your ideas with me - either right below or send me an email, would love to share your input.
 

Wednesday, October 9, 2013

Quick & Easy Dinner Idea

Have you ever felt like you have not the energy to prepare and cook a dinner? Especially on days where you either are very busy and your schedule is packed or you feel a little sick. Well, then I would like to share a dinner idea with you that I love since I was a little child and my parents prepared it for me.
 
TOAST HAWAII
 
Simply, just buy the bread you love, get either ham, chicken or turkey sandwich meat, butter and your choice of sliced cheese (I prefer Baby Swiss slices) and a can of pineapple bits. Preheat your oven to 400F and bake the bread for approximately 10 min.
 
 
There is no need to toast the bread slices before you put them in the oven!
 
 
Finished baked bread.
 
 
You can serve a salad as a side with the baked bread.
And I know the following picture looks a little weird, but my kids love, love, love this simply desert. Since I always have pineapple bits left over, I just mix two spoons of pineapple with my kids favorite yogurt and they munch it in like there is no tomorrow!!
 
 
This dinner is so simple & yummy and fills us all up. If you try it let me know how you liked it!


BOO - The milk jug ghosts

 
BOOOOOO....


Milk jug ghosts and/or Jack O' Lanterns are an inexpensive and a easy way to decorate your staircase or entrance inside and out. Just collect all your empty jugs, take a black permanent marker and start getting creative. If you have older kids then maybe they can even make their own ones.
You could also get black craft paper or stickers and glue them on there, but for me, this was the fastest and easiest way to get them done and my kids love them!
Don't forget to cut a small hole (maybe the size of a cookie) in the back of the jug to place white Christmas lights or electric tea lights in the jugs, so they shine bright in the dark!
 
I will follow up with more pictures once we placed them outside at night.
Have a fantastic HALLOWEEN!!!


Monday, October 7, 2013

Fall decorations!

FALL IS HERE!


And if you haven't decorated your home or entrance yet, well maybe now is the time - since most crafts stores have their fall items reduced and offer great deals!!!!

I thought I share some easy decoration ideas with you, found on one of my favorite pages Pinterest!

This is so awesome and so simple. You don't need to put your pumpkins in an old fashioned wheelbarrow. You can get a small bale of straw and place them on there. All you need is some stencils, black permanent color and a fall garland surround by small pumpkins or even corn! This will make a massive impression.

 
Why not use some flowers combined with some unique pumpins!

 
You could use this perfect idea with the keys, but I have to say I don't have keys that I could use and great looking keys are hard to find. But as an alternative just use stencils and color again!

 
Why buying expensive fall wreaths when you can create one yourself. Now that the leaves are falling from the trees and have so many wonderful colors, just collect them & dry them at home. (You could also use pliable dried leaves from a craft store) Buy a wire wreath form (any crafts store), then cut a slit in the middle of the leaves and string the leaves onto the form. There are endless possibilities what can be added on top of the wreath.

AND FOR THE INSIDE?
Leaves and corn are a must have.


And again, PUMPKINS! Simply cut a hole in the middle of the pumpkin and insert a candle.

 
Or just collect more leaves, try them again and put them around a small juice glass or whatever you have available and tie them up with a small string.
 

This is a great decoration for a dinner during the fall and adds a warm and cozy atmosphere.


Let me know what decoration ideas you have !